

Outdoor lighting depends heavily on one small but critical component: the sensor. When your lights stay on during the day, fail to turn on at night, flicker, or become dim, the issue is often not the LED bulbs or rechargeable batteries, it is the sensor system. Solar powered garden light replacement sensors are designed to restore proper dusk-to-dawn operation, motion detection, and energy efficiency without replacing the entire fixture.
This guide explains how solar powered garden light replacement sensors work, why they fail, how to diagnose sensor problems, how to replace them correctly, and how to maintain long-term performance. We will cover photovoltaic conversion, rechargeable battery systems such as NiMH and lithium-ion, LED efficiency, wiring connections, corrosion issues, IP65/IP67 protection ratings, voltage checks, and proper sunlight positioning all within the context of replacement sensors.
Understanding How Solar Garden Light Sensors Work
Before replacing anything, it is important to understand how the sensor integrates with the solar panel, rechargeable battery, and LED light source.
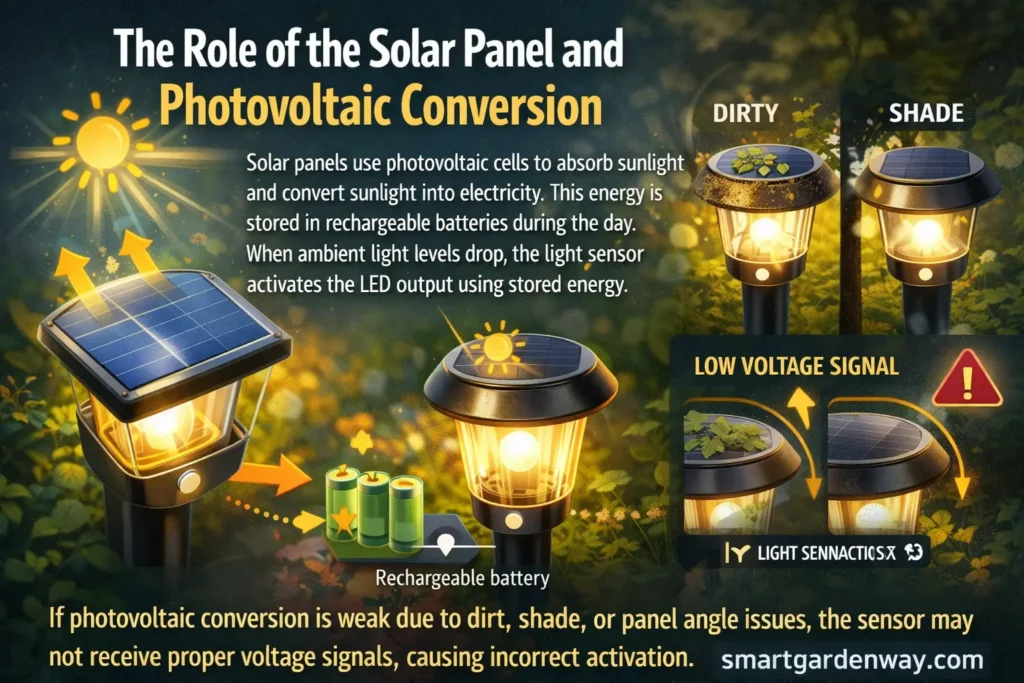
The Role of the Solar Panel and Photovoltaic Conversion
Solar panels use photovoltaic cells to absorb sunlight and convert sunlight into electricity. This energy is stored in rechargeable batteries during the day. When ambient light levels drop, the light sensor activates the LED output using stored energy.
If photovoltaic conversion is weak due to dirt, shade, or panel angle issues, the sensor may not receive proper voltage signals, causing incorrect activation.
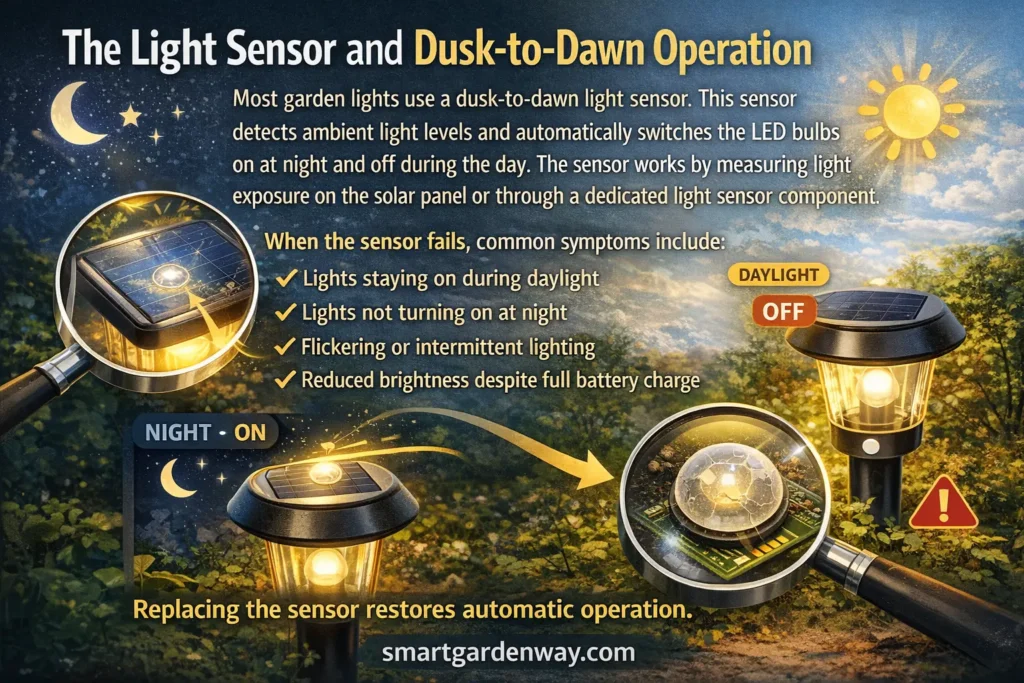
The Light Sensor and Dusk-to-Dawn Operation
Most garden lights use a dusk-to-dawn light sensor. This sensor detects ambient light levels and automatically switches the LED bulbs on at night and off during the day. The sensor works by measuring light exposure on the solar panel or through a dedicated light sensor component.
When the sensor fails, common symptoms include:
- Lights staying on during daylight
- Lights not turning on at night
- Flickering or intermittent lighting
- Reduced brightness despite full battery charge
Replacing the sensor restores automatic operation.
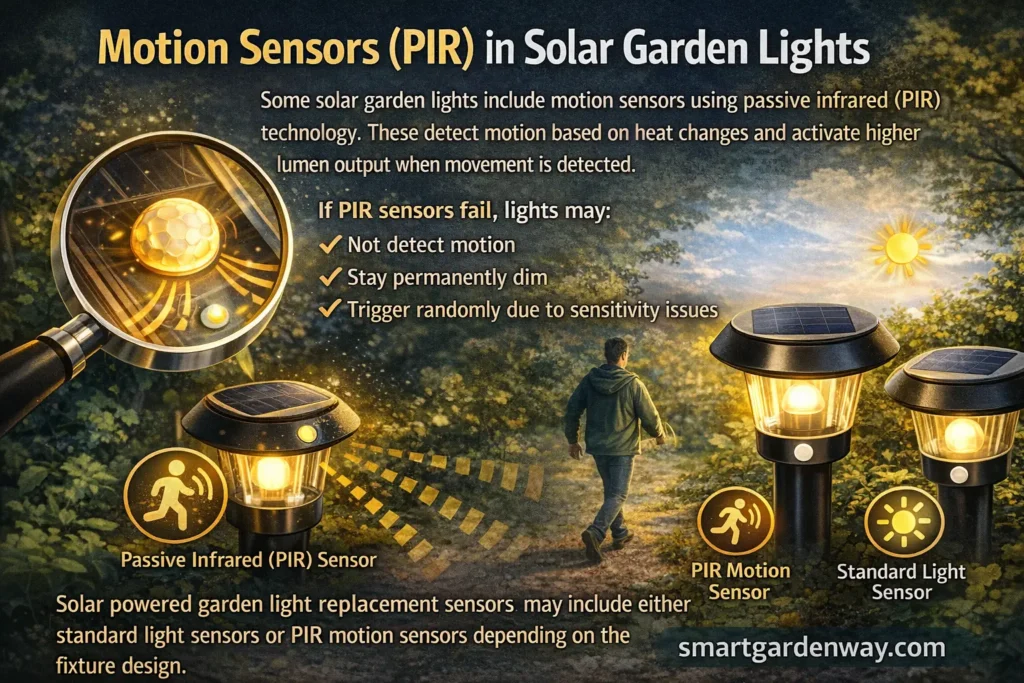
Motion Sensors (PIR) in Solar Garden Lights
Some solar garden lights include motion sensors using passive infrared (PIR) technology. These detect motion based on heat changes and activate higher lumen output when movement is detected.
If PIR sensors fail, lights may:
- Not detect motion
- Stay permanently dim
- Trigger randomly due to sensitivity issues
Solar powered garden light replacement sensors may include either standard light sensors or PIR motion sensors depending on the fixture design.
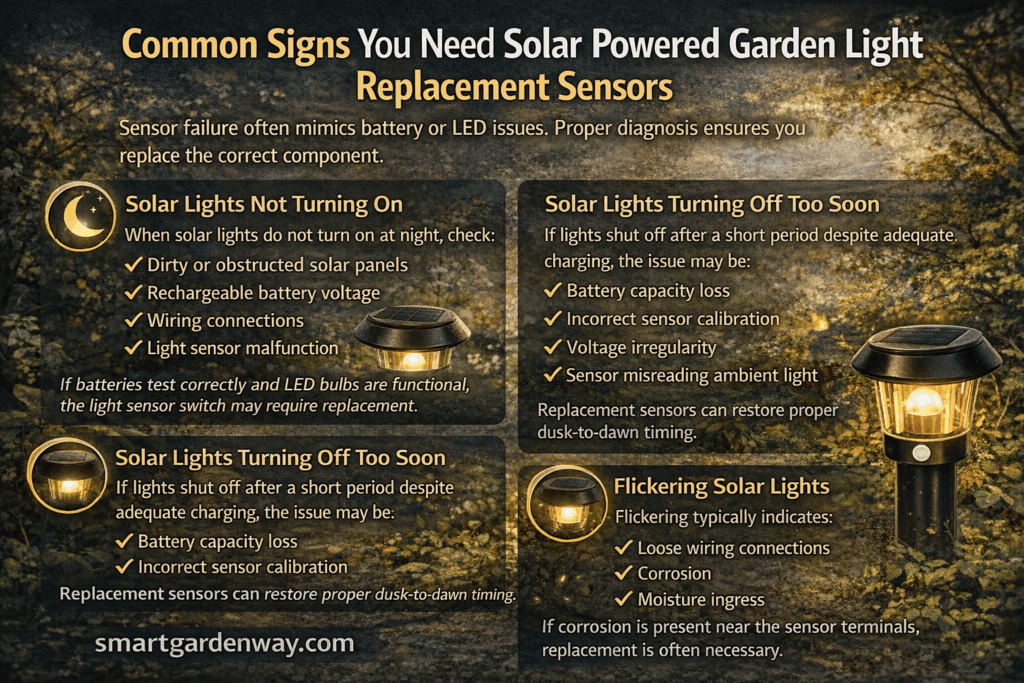
Common Signs You Need Solar Powered Garden Light Replacement Sensors
Sensor failure often mimics battery or LED issues. Proper diagnosis ensures you replace the correct component.
Solar Lights Not Turning On
When solar lights do not turn on at night, check:
- Dirty or obstructed solar panels
- Rechargeable battery voltage
- Wiring connections
- Light sensor malfunction
If batteries test correctly and LED bulbs are functional, the light sensor switch may require replacement.
Solar Lights Turning Off Too Soon
If lights shut off after a short period despite adequate charging, the issue may be:
- Battery capacity loss
- Incorrect sensor calibration
- Voltage irregularity
- Sensor misreading ambient light
Replacement sensors can restore proper dusk-to-dawn timing.
Dim or Weak Lighting Output
Dim lights are often blamed on batteries, but faulty sensors can also restrict current flow to LED components. Accumulated dirt on light covers, poor panel positioning, and degraded rechargeable batteries also contribute, but if voltage is stable and LEDs are intact, replacing the sensor can restore full lumen output.
Flickering Solar Lights
Flickering typically indicates:
- Loose wiring connections
- Corrosion
- Moisture ingress
- Sensor instability
If corrosion is present near the sensor terminals, replacement is often necessary.
Why Solar Garden Light Sensors Fail
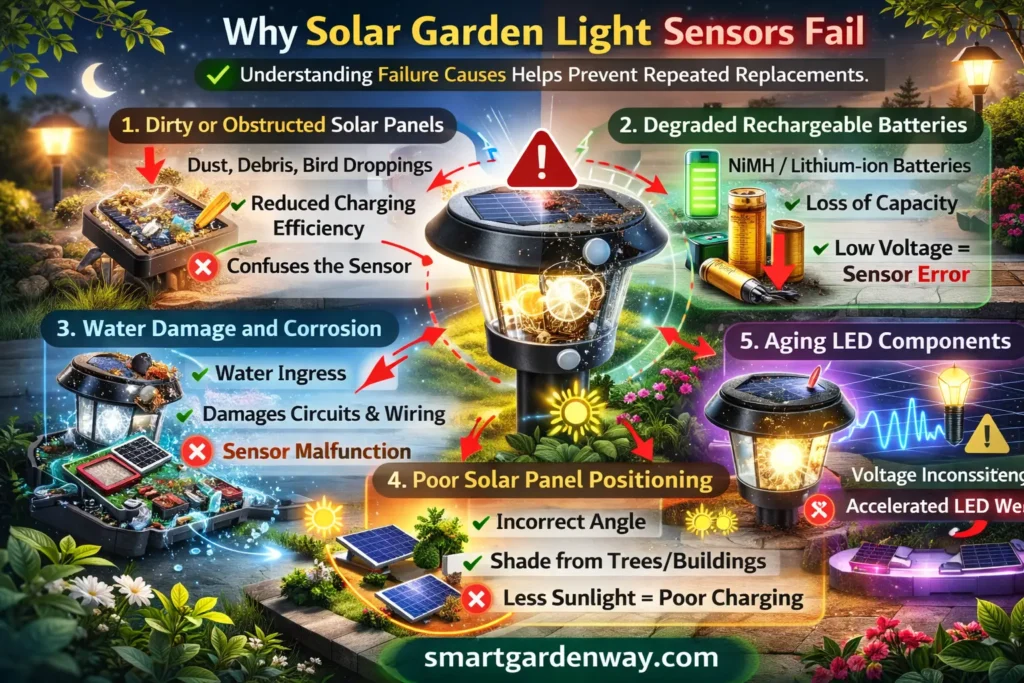
Understanding failure causes helps prevent repeated replacements.
Dirty or Obstructed Solar Panels
Dust, debris, bird droppings, and accumulated dirt reduce charging efficiency. Poor photovoltaic conversion affects voltage regulation, which confuses the sensor.
Degraded Rechargeable Batteries
NiMH batteries and lithium-ion batteries lose capacity over time. If battery voltage drops below the operational threshold, the sensor may misinterpret energy availability.
Water Damage and Corrosion
IP65 and IP67 waterproof ratings protect against moisture, but cracked seals allow water ingress. Internal corrosion damages wiring connections and sensor circuits.
Poor Solar Panel Positioning
Incorrect panel angle reduces sunlight absorption. Shade from trees or buildings decreases charging time, affecting sensor activation cycles.
Aging LED Components
Although LED bulbs have long lifespans, voltage inconsistency caused by sensor faults may accelerate LED wear.
Diagnosing Sensor Problems Before Replacement
Replacing a sensor without testing can waste time and money.
Step 1: Check Direct Sunlight Exposure
Ensure the solar panel receives 6–8 hours of direct sunlight. Trim overhanging branches and remove obstructions.
Step 2: Clean the Solar Panel and Sensor Lens
Use a soft cloth and mild soap to remove dirt and debris. Avoid harsh chemicals.
Step 3: Test Battery Voltage
Using a multimeter, measure battery voltage. If voltage is significantly below rated capacity, replace rechargeable batteries before replacing the sensor.
Step 4: Inspect Wiring Connections
Look for:
- Loose wires
- Damaged insulation
- Corroded contacts
- Moisture inside housing
If wiring is secure and battery voltage is normal, the sensor likely requires replacement.
Step 5: Perform a Reset
Switch off the light, remove batteries, wait 15 minutes, then reinstall. If the issue persists, replacement sensors may be needed.

Types of Solar Powered Garden Light Replacement Sensors
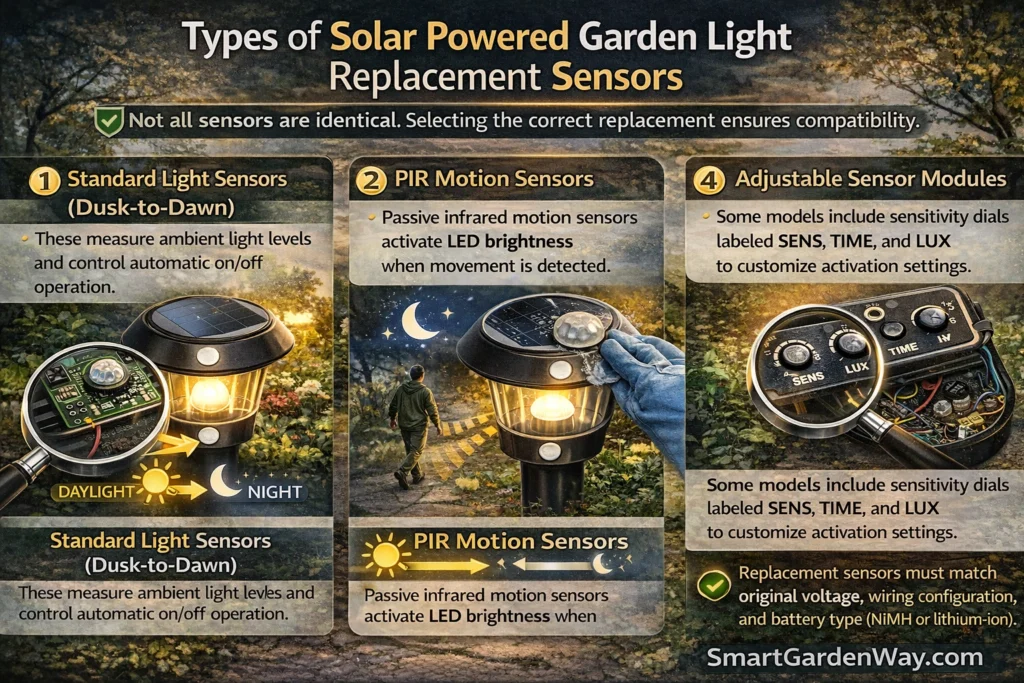
Not all sensors are identical. Selecting the correct replacement ensures compatibility.
Standard Light Sensors (Dusk-to-Dawn)
These measure ambient light levels and control automatic on/off operation.
PIR Motion Sensors
Passive infrared motion sensors activate LED brightness when movement is detected.
Adjustable Sensor Modules
Some models include sensitivity dials labeled SENS, TIME, and LUX to customize activation settings.
Replacement sensors must match original voltage, wiring configuration, and battery type (NiMH or lithium-ion).
How to Replace a Solar Garden Light Sensor
Preparing for Replacement
Disconnect power by removing rechargeable batteries. Ensure the unit is dry and free from moisture.
Opening the Housing
Unscrew the casing carefully. Inspect for corrosion or rust before installing a new sensor.
Disconnecting the Old Sensor
Note wire placement. Disconnect from:
- Battery terminals
- LED circuit
- Solar panel connection
Installing the Replacement Sensor
Attach wires securely. Ensure polarity matches original configuration to avoid voltage mismatch.
Sealing and Weatherproofing
Apply silicone sealant if needed to maintain IP65 or IP67 waterproof protection.
Testing Operation
Reinstall batteries and test in a dark environment. Cover the solar panel to simulate nighttime.
Maintaining Long-Term Sensor Performance
Replacing a sensor should not be a temporary fix.
Clean Solar Panels Regularly
Dust reduces photovoltaic efficiency and impacts sensor accuracy.
Protect Against Moisture
Inspect seals annually. Replace cracked gaskets to prevent water damage and corrosion.
Replace Rechargeable Batteries Periodically
NiMH batteries typically require replacement every 1–2 years. Lithium-ion batteries may last longer but degrade with extreme temperatures.
Ensure Optimal Placement
Position panels for maximum sunlight exposure. Adjust angle seasonally if needed.
Inspect Wiring and Connections
Look for loose or damaged wiring that can affect sensor stability.
Weather Resistance and Environmental Impact
Extreme weather affects sensor lifespan.
Cold Weather Performance
Battery performance drops in winter. Voltage reduction may impact sensor function.
Overcast Conditions
Insufficient sunlight reduces charging efficiency, leading to premature shutoff.
High Humidity and Rain
Moisture ingress leads to corrosion. Proper IP rating and sealing are essential.
When to Replace the Entire Light Instead of the Sensor
In some cases, replacement sensors are not enough.
If the circuit board shows burn marks, severe corrosion, or if LED components have failed extensively, replacing the entire fixture may be more cost-effective.
However, in most cases, Solar powered garden light replacement sensors restore functionality without replacing solar panels, rechargeable batteries, or LED modules.
Optimizing Brightness After Sensor Replacement
Brightness depends on several factors:
- Lumens rating
- Battery capacity
- Direct sunlight exposure
- LED efficiency
- Proper sensor calibration
If brightness remains low after replacement, inspect battery health and solar panel cleanliness.
Advanced Considerations for Motion Sensor Replacement
For PIR motion sensors:
- Check detection range
- Adjust sensitivity (SENS)
- Configure time delay (TIME)
- Set light threshold (LUX)
Proper calibration prevents false triggering and maximizes battery life.
FAQs About Solar Powered Garden Light Replacement Sensors
How to replace a solar light sensor?
To replace a solar light sensor, first remove the rechargeable batteries and open the housing. Disconnect the old sensor from the wiring connections linking the solar panel, LED bulbs, and battery terminals. Install a compatible replacement sensor, match polarity correctly, reseal the casing to maintain IP65 or IP67 protection, and test in a dark environment.
How does a solar light sensor work?
A solar light sensor detects ambient light levels and controls dusk-to-dawn operation. When photovoltaic cells stop receiving sunlight, the sensor allows stored energy from rechargeable batteries to power the LED output. During daylight, the sensor prevents discharge by shutting the light off.
Can I add a motion sensor to an existing outdoor light?
Yes, you can add a PIR motion sensor module if the fixture supports compatible voltage and wiring configuration. The sensor must integrate with the existing solar panel, rechargeable battery system, and LED circuit to ensure proper motion detection and energy efficiency.
What sensors are used in solar panels?
Solar lighting systems commonly use light sensors (photoresistor-based dusk-to-dawn sensors) and PIR motion sensors. The photovoltaic cells in solar panels convert sunlight into electricity, while the light sensor controls activation and the PIR sensor detects movement
Why are my brand new solar lights not working today?
New solar lights may not function if the rechargeable batteries are not fully charged. Ensure 6–8 hours of direct sunlight exposure, remove any protective pull tabs, check the on/off switch, and clean the solar panel to improve charging efficiency.
How to reset solar lights with remote?
Turn the light off using the remote control, remove power by disconnecting the rechargeable batteries if accessible, wait several minutes, then restore power. Ensure proper signal range and confirm the light sensor is not exposed to bright ambient light during testing.
How to fix solar light not working at night?
Check for dirty or obstructed solar panels, inspect battery voltage using a multimeter, and verify that the light sensor is not exposed to artificial light. If wiring connections and batteries are intact, the sensor may require replacement.
How to replace solar light batteries?
Open the casing, remove old NiMH or lithium-ion rechargeable batteries, and install compatible replacements matching voltage and capacity. Ensure correct polarity and reseal the housing to protect against moisture and corrosion.
How to reset solar lights without remote?
Switch the light off manually, remove the rechargeable batteries, wait 10–15 minutes, then reinstall them. Cover the solar panel to simulate darkness and confirm proper dusk-to-dawn activation.
Solar Light IP67 battery replacement – what should I know?
When replacing batteries in IP67-rated solar lights, maintain waterproof sealing. Use compatible rechargeable batteries, inspect for corrosion, and ensure gaskets are intact before closing the housing to preserve water resistance.
How to change battery in crackle solar light?
Remove the decorative crackle globe carefully, access the battery compartment, and replace the rechargeable battery with the same voltage type. Reassemble securely to maintain alignment with the light sensor and solar panel.
Where are the batteries in solar lights?
Rechargeable batteries are typically located beneath the solar panel housing or inside the main light casing. They connect directly to the photovoltaic panel and sensor circuit to store energy for nighttime LED operation.
Conclusion
Solar garden lighting systems depend on a precise balance between solar panels, photovoltaic conversion, rechargeable batteries, LED output, and sensor control. When that balance fails, the sensor is often the underlying issue. Solar powered garden light replacement sensors provide a cost-effective and practical solution to restore dusk-to-dawn activation, motion detection, and proper lumen output without replacing the entire lighting unit.
By diagnosing issues correctly, checking battery voltage, cleaning solar panels, inspecting wiring connections, and evaluating moisture damage you can determine whether a sensor replacement is necessary. Proper installation, weatherproof sealing, and routine maintenance ensure long-term reliability. With clean panels, healthy rechargeable batteries such as NiMH or lithium-ion, secure wiring, and a correctly calibrated sensor, your solar garden lights can deliver efficient, sustainable, and consistent outdoor illumination for years.
Investing in replacement sensors not only restores functionality but also maximizes energy efficiency, protects against corrosion, and maintains reliable automatic lighting performance in all seasons.